Frequently Asked Questions
We understand you may have questions about our products or services, and we’re here to help. If you don’t see the answer you are looking for, please don’t hesitate to contact us directly. Our team is always happy to assist you in any way we can.
Quick Finds
Data Protection and Retention
The myQAP portal is built on Heroku Enterprise in a private space, with data resident in Australia.
The Postgres database is protected using continuous protection and is available with copies in two different availability zones. If the primary database fails, it is automatically replaced with another replica database called a standby. This happens regularly and automatically whenever security updates are required and is usually not noticed by the user. Along with continuous protection, we keep daily backups for seven days and monthly backups beyond that.
The myQAP portal holds reports generated from 2013 onward. We will retain records, including comments and attachments associated with reports, in the portal for 15 years. After that time, we will contact you to ask if you would like old records purged or retained. If you request that records are retained beyond 15 years, we will retain your data in the portal for as long as it is technically possible to do so.
Customer access to records is only removed if a request is submitted to be inactivated. These can be made active again at a later date if records are required again.
Payment Methods/Options
All invoices should be paid in AUSTRALIAN Dollars. On completion of enrolment via myQAP, a Tax Invoice is automatically generated and participants are then provided with several payment options.
IMPORTANT NOTE: To avoid a delay in the processing of payment and to ensure the allocation of payment to the correct invoice please forward your remittance advice to [email protected]
Paying by myQAP – Pay gateway
Click on the ‘Invoices’ tab in myQAP and select the ‘Pay Now’ icon next to the relevant invoice and follow the steps to pay the invoice on-line.
myQAP > Invoice Tab >![]()
Paying by credit card
If you want to pay via credit card, please contact [email protected] and they will get in touch to process payment.
Paying by Electronic Funds Transfer (EFT)
Company Name: RCPA Quality Assurance Programs Pty Limited
Account Name: RCPA Quality Assurance Programs Pty Limited ‐ Enrolment Account
Bank: Westpac Bank
Branch: Sydney
BSB No: 032‐000
Swift code: WPAC AU2S
Account No: 186614
Paying by internet banking – BPAY®
Contact your bank or financial institution to make this payment from your cheque, savings, debit, credit card or transaction account.
More info: www.bpay.com.au
![]()
Paying by cheque
Please make cheques payable to “RCPA QUALITY ASSURANCE PROGRAMS PTY LTD” in AUD$ (other currencies will not be accepted) and return together with the remittance advice to:
Enrolment Office
RCPA Quality Assurance Programs Pty Ltd
Suite 201, Level 2, 8 Herbert Street
St Leonards NSW 2065
AUSTRALIA
Enrol using myQAP
For those participants who have enrolled via their local distributor, the “Enrolments” tab is not available in the myQAP portal. You must contact your local distributor for all enrolment queries.
Select the ‘Enrolments’ tab in the myQAP portal.
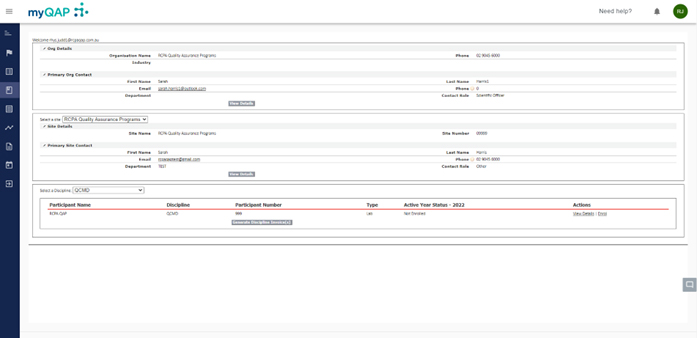
Select the appropriate ‘Site’ and ‘Discipline’ that the enrolment is being processed for by using the drop-down menus.
Select the relevant participant number to enrol, these options will be displayed at the bottom of the screen beneath the red line.
On the far right hand side of the screen, under the ‘Actions’ column, there is an ‘Enrol’ option. Please select this button to enrol.

Select module(s) to Enrol
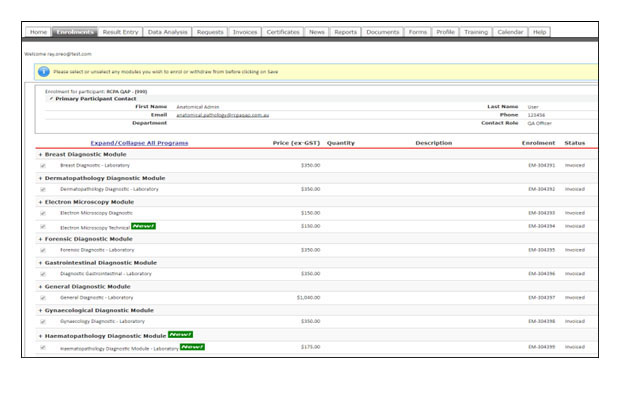
A complete list of modules available for the current enrolment year will be displayed for the selected discipline. If a participant has been enrolled in the previous enrolment year, the system will remember these selections and automatically pre-tick these modules. Any ‘NEW’ modules that are being offered will be highlighted with a green ‘New’ icon and you can add to your order if required by ticking the relevant box.
![]()
Use the ‘Expand/Collapse All Programs’ button to expand or collapse the listing.
Collapsed
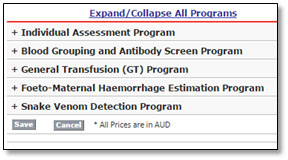
Expanded
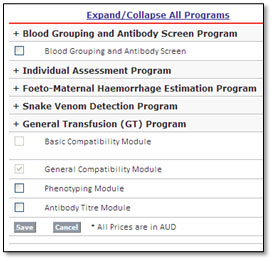
Select modules to enrol by ticking the module. Untick the modules to remove them from the enrolment selection.
Once all the modules to enrol have been selected, click ‘Save’ at the bottom left hand side of the screen.
After the ‘Save’ button has been selected a ‘pop up’ will appear providing you with two invoicing options – ‘Generate Now’ or ‘Generate Later.
After January, items will be placed onto approval. When the status is indicated as Approval, you can click the Generate Now or Later Options but will not be able to finalise the invoice until RCPAQAP staff have approved the enrolment.
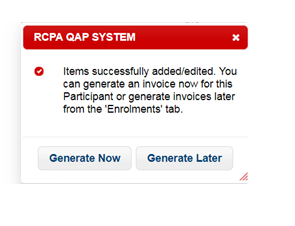
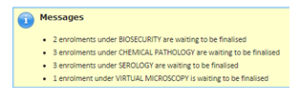
If you select “Generate Now” the system will navigate you to the page to finalise. By clicking “Generate Later” this will redirect you back to the Enrolment’s page to process additional Enrolments. If you choose Generate Later, messages will appear in your enrolment screen to indicate how many enrolments are awaiting finalisation.
Finalise Enrolment
To complete the enrolment process, please remember to ‘Generate Discipline Invoice(s)’ at the bottom center of the screen. Depending on a person’s level of access within the myQAP hierarchy, contacts may be able to ‘Generate Site Invoice(s’) or ‘Generate Org Invoice(s’).

If you have not generated and received an invoice, the enrolment is not finalised and received by the RCPAQAP for processing.
The next stage is the billing section. Invoices will be automatically populated with the default address that is recorded at the Organisational level in myQAP. If the invoice address requires amendment, please type into the available fields to update the details as required.

Note: There is a ‘Billing Email Address’ section available. At this point, an accounts payable e-mail can be added so a PDF copy of the invoice is sent for processing. The creator of the invoice will also automatically receive a copy of the invoice via e-mail.
Below this billing information will be a summary of the modules that have been selected, please check the order before clicking ‘Finalise Enrolment’.

This will take you to a confirmation of the relevant Terms of Trade. These need to be agreed to before you can finalise the enrolment and receive the invoice.

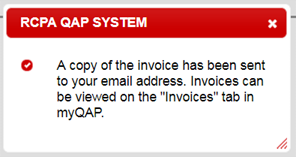
The next image will appear indicating that the process is finalised.
The invoice will be generated and e-mailed to the person who created the enrolment (invoice owner) for processing. You can select the ‘Invoices’ tab in myQAP to view a PDF copy of the invoice.
For details on how to edit an invoice address or purchase order number after the invoice generation, please refer to the ‘How to View Invoices and use the Payment Gateway’ instructional ‘Help’ material.
Adding Additional Modules/Module Options
Additional module options can be added after an enrolment has been checked out by navigating back to the ‘Enrolments’ tab. These additions can be added by following the same initial enrolment process.
- Select the additional option under the relevant participant number by ticking the box
- Save the item(s) at the bottom left hand side of the screen
- Then ‘Generate Discipline Invoice(s) and ‘Finalise Enrolment’
A new invoice will then be generated for the additional option(s).
Survey Results for any additions can then also be entered via the on-line submission of results system.
Cancellations
All cancellations/enrolment changes must be processed by the Enrolment Office.
For enrolment changes/amendments, please log a cancellation request in myQAP using the ‘Requests’ tab. These can only be requested by users with Full access.
The enrolment office will then make the relevant changes and e-mail a confirmation, including any relevant information/attachments.
Pro-Rata Rates
From late January onwards, we begin placing items on ‘Approval’. This means that all enrolments during and after this time must be approved by RCPAQAP staff.
At this point we will check sample availability and apply the appropriate pro-rata rates prior to the finalisation of the enrolment.
A confirmation e-mail will be sent advising participants to finalise the enrolment via the myQAP Customer Portal.
If the RCPAQAP is unable to accommodate the order, an e-mail will be sent to advise that we are unable to accommodate the Request.
Defining Contact Roles
Organisation Contact
This is normally the Director of Pathology/Quality Manager (or equivalent) who oversees the entire Organisation. Communication will mainly occur at the participant contact level, however, these contacts will be our final point of contact if there are any issues that require escalation. Users assigned at this level will have access to reports (not result entry) for all sites and their participants. They can also add contacts on the site and participant level.
Site Contact
Most often this is a Laboratory Manager (or equivalent) who oversees a particular site (location) and the participants associated with that site. They can add contacts, review reports and enrol participants associated with the site.
Primary Participant Contact
This is normally the Scientist in Charge/Supervisor of a particular participant number(s). They may enrol, add or remove contacts, enter results and review reports for all participant numbers they are assigned to. Shipments are also addressed to this individual and shipment notifications will be sent to them.
Participant contacts
Contacts can be added to one or many participant numbers to facilitate online result entry, and review of electronic PDF survey reports and of certificates of enrolment/participation. There is no limit to the number of contacts that can be assigned to any participant.
Finance Department/Accounts Payable
Staff granted this profile will sit at the Organisational level of the hierarchy and will have access to all QAP company invoices for prompt processing.
We do appreciate that some of the roles may vary and users can be assigned at each of these levels as needed.
For each of these Contacts the following mandatory details are required to establish the profiles in myQAP:
- Full Name
- E-mail Address
- Phone number
- Role (e.g., Scientific Officer, Laboratory Manager, Technical Officer)
- Access Level (Details on access levels below)
Full Access
A ‘Full Access’ user will have access to all areas within the myQAP customer portal, primarily, this will include enrolments, invoices, reports and result entry.
Limited Access
A ‘Limited Access’ user will have access to all of the myQAP tabs excluding ‘Enrolments’ and ‘Invoices’. This profile is for laboratory staff who will review survey reports, but do not need to enrol or manage invoices.
myQAP Portal Result Entry Only
This profile has been created to facilitate the online entry of survey results through the myQAP portal.
Finance Department Access
A Finance Department profile has also been created to make the payment process easier. Participants will need to log a myQAP Request to add an accounts payable contact. If this profile is selected, the user will have access to invoices and requests. This will allow the nominated contact to easily access copies of invoices for prompt processing and raise queries for any issues.
The RCPAQAP is committed to protecting the information we collect, which is stored and not divulged to any third party.
When a staff member leaves the organisation, raise a request to notify the RCPAQAP. The user’s profile will then be de-activated ensuring they no longer have access to any items associated with your organisation.
View Invoices and use the Pay Gateway
Log into ‘myQAP’ and select the ‘Invoices’ tab.
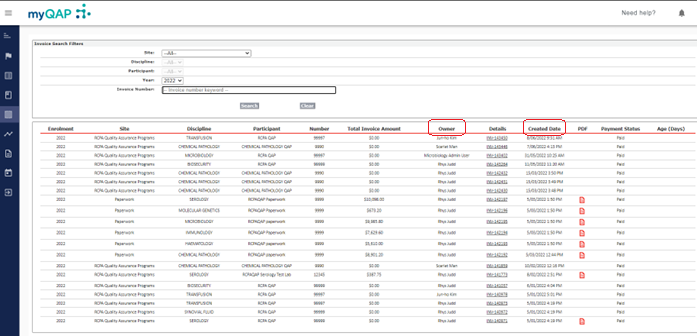
A list of invoices will be displayed, visibility of which will depend on access rights. Participants can filter invoice records to search for a specific invoice. The filter includes; Site, Discipline, Participant and Enrolment Year. Please note the Invoice Number field is a free text option. This free text option allows participants to add the invoice reference number (if known) and click search to quickly view the invoice record. Please note, if the number is shortened in any way, all possible results that include these digits will be displayed (note you do not need to include INV- within this free text search feature).
Any outstanding invoices will be displayed at the top of the list. In the ‘Age (Days)’ column, the number of days since the invoice has been created will be displayed.
Black text = Still within the 30 day payment period.
Red text = Exceeding the 30 day payment period. A copy of the invoice can be viewed by clicking the relevant PDF ‘Icon’ in the corresponding ‘PDF’ column.
Amending invoice details
Participant contacts are able to ‘Edit’ the invoice, such as the ‘Billing Address details’ and can also add a ‘Purchase Order Number’ if required. Please note that these sections are the only editable fields on the invoice.

Once the appropriate changes have been made, click ‘Save & Regenerate’ and the updated invoice will be available in myQAP.
![]()
Participants are unable to cancel modules from the “Invoice” page. Please log a myQAP request if you wish to cancel module/s from the invoice. This can be done by clicking on the relevant ‘INV-‘reference number in the ‘Details’ column. Once selected this will redirect you to the invoice details page.
Outstanding invoices can be paid using a credit card via the ‘Pay Gateway’ feature.

Click ‘Pay Now’ to begin the payment process via the myQAP ‘Pay Gateway.
Pay Gateway Instructions
Review the details for the invoice you have selected and click ‘Pay Now’.

A secure page which connects to Westpac Bank will appear where the credit card details can be entered. Enter the required details and click ‘Next’ to continue.

Participants will then be asked to confirm that the payment details are correct. To proceed with the payment, enter the verification code from the image displayed into the blank box and click ‘Make Payment’.

The ‘Online Payment Receipt’ page will then appear and participants are provided with two options. The e-mail address section can be populated so an electronic receipt can be e-mailed by clicking ‘Send’. Alternatively, participants can print a hard copy of their payment receipt by clicking ‘Print’.

Here is an example of what the ‘Online Payment Receipt’ looks like. Click ‘Finish’ to return to the myQAP ‘Invoices’ tab. The myQAP system will be automatically updated to reflect that the payment has now been processed and the retrospective invoice will display an amount owing of $0.00.

Maintain Contact Information
Contact hierarchy
- Organisation Contact – will have visibility of all contacts of the Organisation. This user can add and or update contacts at the Organisation, Site and Participant level.
- Site Contact – will have visibility across all participants’ contacts listed under that particular site. The site contact can add contacts at the Site/Participant level.
- Primary Participant Contact – can manage contact information for their participant. The primary contact can add or update all contacts at a participant level including amending the ‘primary contact’ and active status for participant contacts.
It is critical that contact information and access to our systems are kept up to date. Whilst you can remove access from participants, only RCPAQAP Staff can inactivate an account completely.
In the case of a contact leaving your organisation, contact the RCPAQAP Customer Service team to have their account deactivated. (You will not need to remove their access on each participant). If they are assigned as a primary participant contact for any participants, you will need to nominate another individual to be assigned as the primary contact.
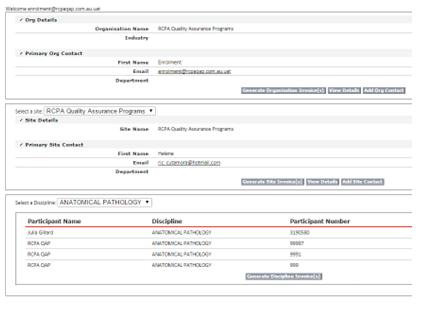
From the Home page, select the ‘Enrolments’ tab and click the “Add Contact” option at the level you need to perform the update, as per below:
Figure 1: Illustrates the Enrolments page for a Participant Contact at the Organisation level

Figure 2: Illustrates the Enrolments page for a Participant Contact at the Participant level

When the ‘Add contact’ button is selected, a search bar will appear allowing a search to be performed to check if the contact already exists in the system. It is recommended to use this first, search for the first name and last name separately. If the contact already exists, they can then be associated to the relevant Organisation/Site/Participant. If nothing appears, click ‘Next’ and the screen to create a new contact profile will be displayed.

Please note that the sections highlighted with a red bar (particularly the e-mail address section) are mandatory fields. This information is crucial in order to log in and receive e-mail reminders and notifications.

Please remember to click ‘Save’ to update the details. Each contact that is created will be granted automatic customer portal access. If participants are unable to add a contact due to access level restrictions and are unable to reach the current primary contact to initiate access, please log a ‘Request’ in myQAP for assistance.
When doing so, ensure you mention the participant numbers you require access to, who your current primary contact is and provide your Full name, email address, phone number and Role. Users that raise requests in this way are given Limited access accounts.
Logging a Request
From the Home page select ‘Requests’.

All existing participant contacts are encouraged to log requests via myQAP. Enquiries that are logged in this manner by the customer help ensure the correct information is captured to handle an item without our staff needing to reach out for further information. A list of Requests that the users has raised are also available, and this history can be accessed by clicking the relevant request ID e.g. 00008800. There are different Request options that are available via the myQAP Customer Portal. ‘General Request’ ‘Add a Contact ‘Add New Participant Number Request’ & ‘ Request for Cancellation’.
General Request
If you wish to contact the RCPAQAP regarding a ‘General’ enquiry, to request assistance or to provide feedback, please select the ‘General Request’ option.

After the ‘General Request’ option has been chosen, a page to complete the request details will appear. Use the drop down menus to select the appropriate Site, Discipline and ‘Participant Number’ that the request should be logged against. If not applicable, please tick “This request is not related to a participant” tick box. Provide the ‘Request Details” such as the reason for contacting the RCPAQAP using the ‘Reason for Request’ drop down menus.

Participants can also select a ‘Request Option’ that relates to the selected ‘Request Details’, from the available drop down list. There is a ‘Description’ field at the bottom of the page where further details relating to the request can be added. Once you are happy with the content of the request, remember to click ‘Save’.

Adding an attachment
An attachment can be added once the request has been saved. Select and reopen the Request number that was just created.

Select Attachments and click on Attach File.

Select the file, Click Attach File and then Done. The file is now added to the Request record.

Add a Contact Request
If you wish to add additional contacts to a participant, site or organisation and do not have the right privileges to perform this action in myQAP, please select this request option:

Please note that the ‘Request Details’ and the ‘Request Options’ are defaulted to the correct selection. All you need to provide is the name, email address, telephone number, role, the discipline and participant numbers that the contact requires access to:

Add New Participant Number Request
If you wish to register a new laboratory/instrument/analyser with the RCPAQAP, select the ‘Request New Participant Number’ Request option.

When the ‘Add Request New Participant Number’ type is selected, an electronic form will appear that prompts participants to provide all of the necessary information to set up a ‘New Participant Number’ in the myQAP system. There is also a ‘Description’ field at the bottom of the page where further details relating to the request can be added.
Request for Cancellation

To request cancellation of an enrolment/s, select the Request for Cancellation option.
This is only available to users with full access. If you do not have full access, you will not be able to request a cancellation.
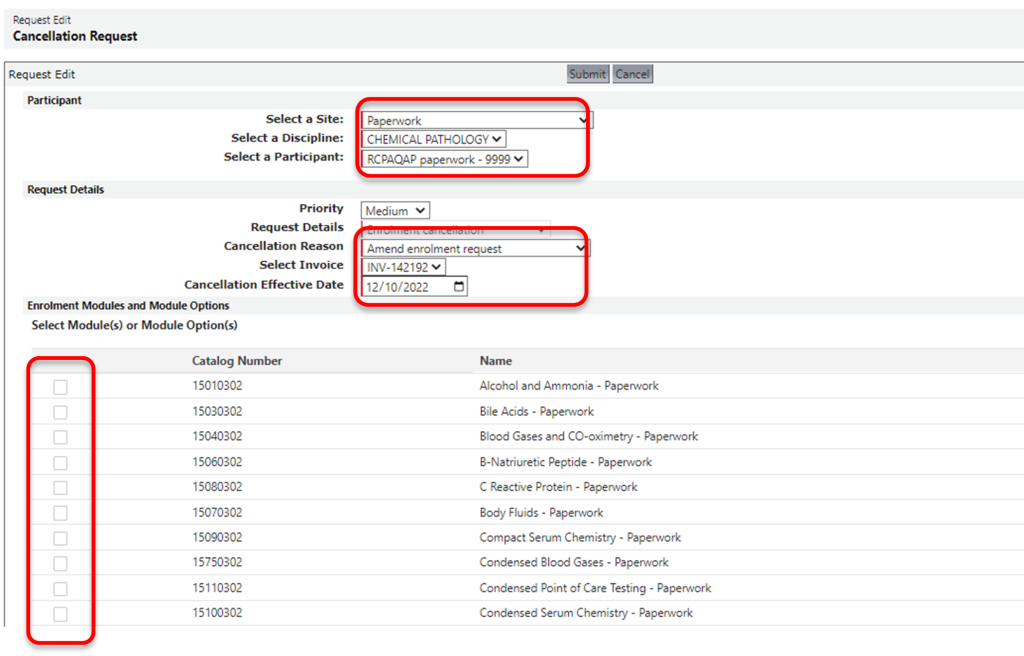
Users will need to select the relevant site, discipline and participant number for the cancellation. Users are only able to request cancellations for the currently active enrolment year. When cancellation is needed for the previous year after the new enrolment year has started, contact RCPAQAP staff by raising a general request.
Select the invoice that is having items cancelled and indicate what date the cancellation should take effect. If the current date is selected, once approved the cancellation will take immediate effect.
A cancellation reason will need to be provided. You can also provide a comment at the bottom of the page. Once these have been filled out, you will be able to select through the items to be cancelled.
When finished, click submit. A final confirmation will pop up before the cancellation request is sent to RCPAQAP staff to review and approve cancellation.
Report Follow Up
Where are the flags?
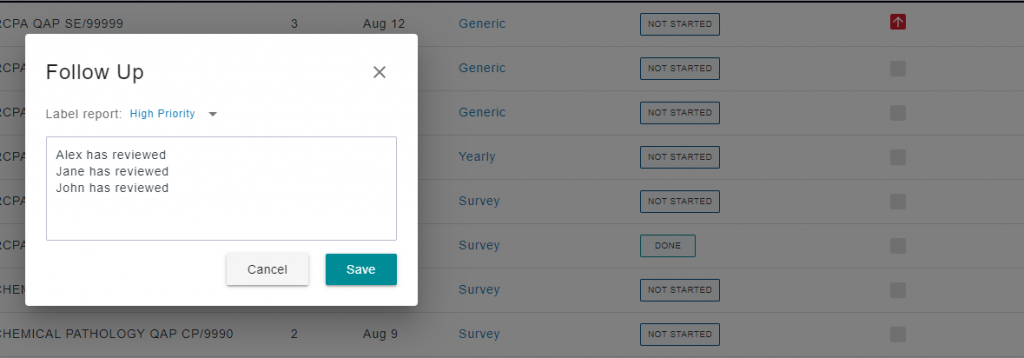
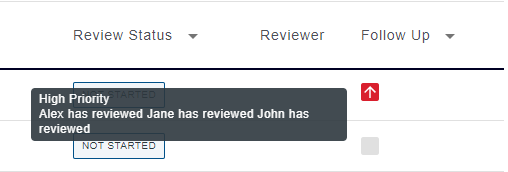
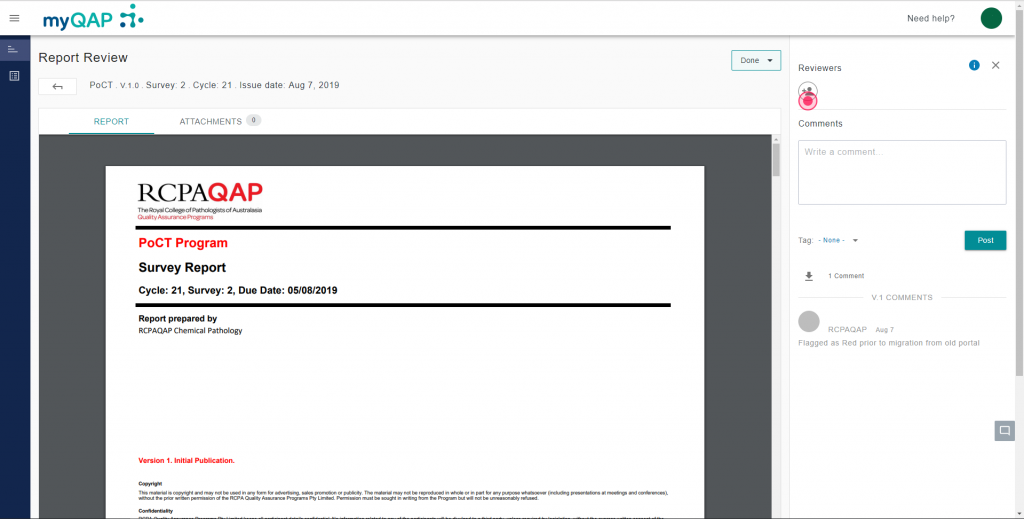
The new myQAP portal has replaced the flagging system with the follow-up function. This allows for a quick glance of a reports priority. The ability to add a comment here is also now an option. Hovering over the square will give a snapshot of it’s importance and reveal the comment.
Are my old flags still visible?
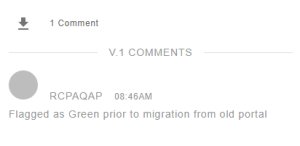
Flags from the old portal have been ported through. Red and yellow flags will display as “High” and “Medium” priority, whilst green flags will appear as a comment in the report.
What about the comments and attachments?
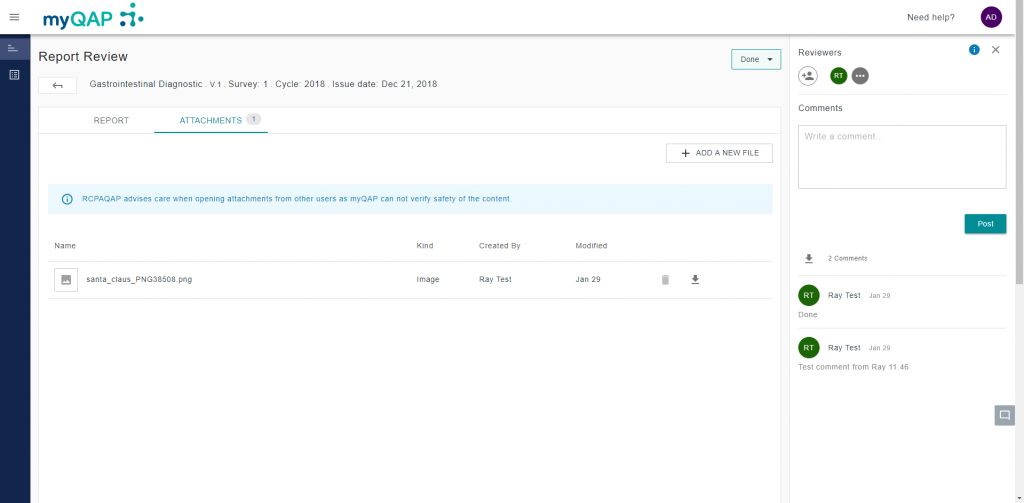
Before upgrading to the new portal, we built a live port for all comments and attachments. They will appear on their respective reports.
Please note that we are currently working on further optimisations and the information here is subject to change.
myQAP Email Notifications
Why do we send email notifications?
We send out email notifications to inform you of things relevant to your myQAP account and your EQA.
What notifications do we send?
Email notifications are sent to inform you of different things related to the myQAP portal. The following is a list of all notifications we send:
- When your new myQAP portal account is created
- When you set or reset your password
- When you have been assigned as a reviewer
- After you submit results (to the submitting user only)
- After a new report is available or a report has been amended
- A new survey is opening and on closing when no submission has been made
- If a program closing date changes
- The release of a program certificate
- For results submitted through HL7
Where available, we will roll up these emails to show all related participant numbers in one email.
Can I change the frequency of emails?
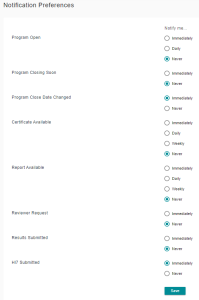
The ability to lower the frequency and even stop certain types of emails is available in the portal. Simply click your initials in the top right hand of screen, click the “Notification preferences” option and adjust the frequency.
My preferences are correct, why aren’t I receiving emails?
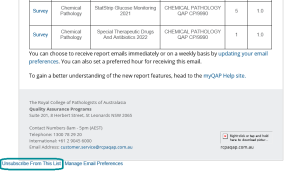
As per our legal requirements, every email we send out has an option to unsubscribe. This is a direct global unsubscribe, by our email hosting service, and this will override your portal settings. It is possible you have previously unsubscribed via this way, and hence, you will not receive our emails. To rectify this, please contact [email protected] and we will take a look at it for you.
Options around the frequency of emails is subject to change.
myQAP Supported Browsers
The following browsers are supported by the myQAP portal:
- Google Chrome 70, or higher [Recommended]
- Firefox 70, or higher
- Microsoft Edge 80, or higher
- Safari 11.1, or higher for Mac
- Safari 5.1, or higher for Windows
- Opera 60, or higher
- Internet Explorer 11 is not supported by the myQAP portal. The use of Internet Explorer may result in errors.
Browsers versions not listed may not behave reliably.


